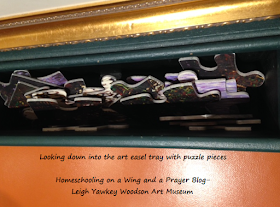
 The museum recently opened a large, new section and part of it is a great area for children. Frankly, it was adorable! Anyway, as I make my way through it (mind you I do not have littles anymore but it was fun to look about), my eyes spied the cleverly done art/puzzle wall. I had to investigate and thought I would share this cute idea.
 Basically, it is an art easel [theirs were from Dick Blick, but any good easel would work] with a magnetic sheet mounted behind a painted art frame. This was all securely attached to the wall. I wish the people who put this together were there for me to get more details on how they found/did this. I would have been able to get a better grasp of how they constructed it all-esp. the magnetic board. I will do some research (and of course let you know what I find) to see if I can find some already painted white. I guess if it's not white-one could paint it that to give the whole thing a "white paper" on an easel look. Then off to the side they had a picture that was a visual guide for the child to follow. I would actually have the picture printed a bit larger, it seemed a wee bit too small but alas-that is my unsolicited suggestion on that. Then below the easel was a large box (presumably made by someone-but there are tons of storage pockets like this on the market so one could wing it a bit) that held the puzzle pieces. The parrot picture was printed right on the magnetic sheet, with the birds being the puzzle part.
This one had pieces that were slipping (two magnet on plastic strip backing)
so I pointed that out and they promptly sent their fix-it man to take care of that.
Basic Supply List
*Art easel that is large enough to hold your framed magnetic piece
*Frame of your choosing that is slightly larger than your magnetic board
*Magnetic board -painted if it is not already white
*Paint for the magnetic board (be sure it will adhere to it, and for the wood backing for the puzzle-if you go that route)
*Box to attach below that is large enough to hold big puzzle pieces
*Magnetic strip that is self-sticking
*Art work that can be cut up (or there are some big sized puzzles that you could simply attach magnets to and cut the cover out as their guide)
*Smaller print of the artwork for the guide
*Backing-whether it is a thinner wood or sturdy foam board (wood should be painted for a more finished look and to prevent slivers and such)
*Modge Podge to attach the puzzle to the board
*Someone to cut the pieces, my guess is a band saw would do the job perfectly or some very sharp, precise cutting tool that will give you nice clean puzzle edges.
If you decide to do this project, please come back here with a link to your picture so we can all see how yours turned out!
Thanks to the Leigh Yawkey Woodson Museum for this great experience!
Info on the children's activities is found here.
The museum is located in Wausau, Wisconsin. If you are nearby, be sure to check it out. There are some really nice pieces of art, and the kid area is fun too!


No comments:
Post a Comment
Please remember this is a Christian, family-oriented blog. NO rude, thoughtless or otherwise nasty comments will be published. Thank you.